Houdini - Python Panel Hello World
Create python libs directory
If the directory pythonx.ylibs is not found in the Houdini HOUDINI_USER_PREF_DIR directory, create it.
HOUDINI_USER_PREF_DIR-> The directory to store user preference files. The value of this variable must include the substring__HVER__, which will be replaced at run time with the currentMAJOR.MINORversion string. On Windows and Linux, this defaults to the expanded value of$HOME/houdini__HVER__. On Mac OSX, it will also use this default if the directory exists, else it uses the expanded value of$HOME/Library/Preferences/houdini/__HVER__.
HOUDINI_USER_DIR-$HOME/houdini20.5HOUDINI_USER_PREF_DIR-$HOME/Documents/houdini20.5
Where the default user preferences directory on Windows for example C:\Users\teoti\OneDrive\Documents\houdini20.5.
- Create
C:\Users\teoti\OneDrive\Documents\houdini20.5\[pythonx.ylibs], e.g.python3.11libs(this version of python in your Houdini install, if the directory does not exist).
See
- https://www.sidefx.com/docs/houdini/ref/plugins.html
- https://www.sidefx.com/docs/houdini/ref/env.html
Create the python module directory
- Create
C:\Users\teoti\OneDrive\Documents\houdini20.5\pythonx.ylibs\helloworld
Where helloworld directory is the new module name.
Open an IDE or Code eidtor
You can use any text editor but PyCharm and VSCode work with the previous setup instructions.
PyCharm
VSCode
- https://pakreht.com/houdini/configure-vscode-for-python/
- https://www.sidefx.com/forum/topic/96198/?page=1#post-422964
Create two stub py files for later
-
In the directory
C:\Users\teoti\OneDrive\Documents\houdini20.5\pythonx.ylibs\helloworld, create:Where
xis major version andyis minor version.__init__.pyhelloworld.py
Directory$HOUDINI_USER_PREF_DIR/houdini[X.Y]/
- …
Directorypresets/
- …
Directorypython_panels/
- …
Directorypython[x.y]libs/
Directoryhelloworld
- __init__.py
- helloworld.py
DirectoryQtWebEngine/
- …
- …
Leave these files empty for now, we will get back to them.
Create the Python Panel
- Open Houdini.
- Select
Windows->Python Panel Editor. - Select
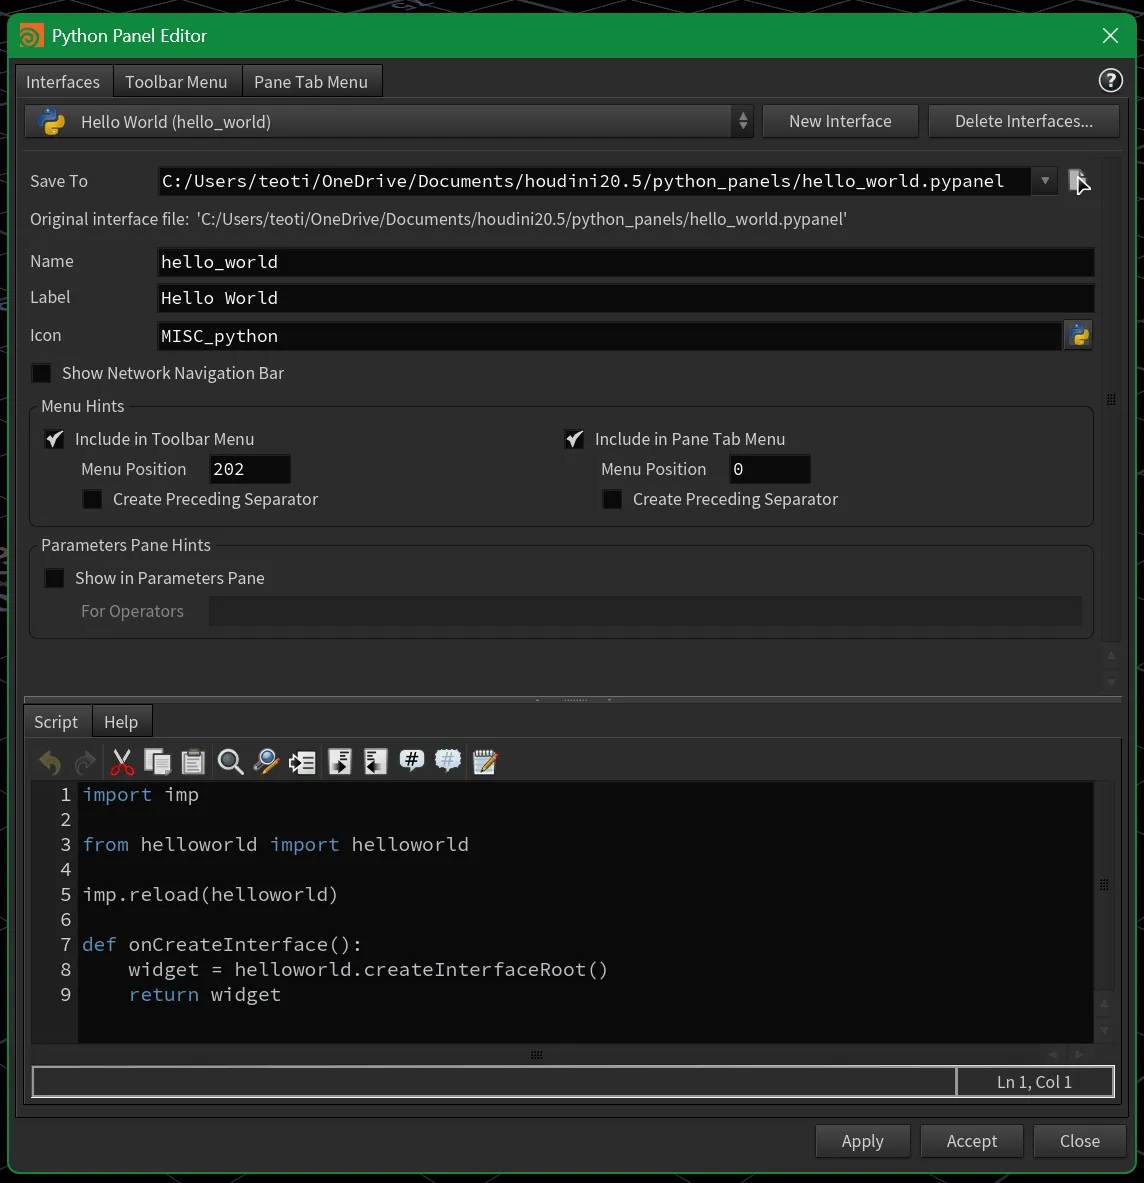
New Interface. - Set
Save To$HOUDINI_USER_PREF_DIR/houdini[X.Y]/python_panels/hello_world.pypanel. - Set
Name: hello_world.- Do not change this after
Apply, houdini will loose it.
- Do not change this after
- Set
Label: Hello World.- Shows up in the menus by Right clicking a Pane Tab.
- Check the
Include in Pane Tab Menu, leaving the other values at default. - Click
Apply.
The hello_world.pypanel file has now been created in your $HOUDINI_USER_PREF_DIR/houdini[X.Y]/python_panels/ directory.
The final directory layout;
Directory$HOUDINI_USER_PREF_DIR/houdini[X.Y]/
- …
Directorypresets/
- …
Directorypython_panels/
- …
- hello_world.pypanel
- …
Directorypython[x.y]libs/
Directoryhelloworld
- __init__.py
- helloworld.py
DirectoryQtWebEngine/
- …
- …
Houdini bootstrap Pane creation code
-
Add the simple bootstrap code below for the Python Pane creation.
import impfrom helloworld import helloworldimp.reload(helloworld)def onCreateInterface():widget = helloworld.createInterfaceRoot()return widget -
Click
Acceptand now close Houdini so it can reload and parse the newhelloworldmodule we created.
Module bootstrap Code
Now we will create a simple QPushButton from the QtWidgets namespace of PySide2 ui framework.
The way the root pane layout manager works is it will stretch this button to full width and height extents. Normally in a panel you will create a layout container to hold this button or other UI components, for example the QHBoxLayout.
-
No code in the
__init__.pytoday.__init__.py # TODO -
Add the code below to the
helloworld.pymodule file.helloworld.py import houfrom PySide2.QtWidgets import QPushButtondef createInterfaceRoot():widget = QPushButton("Panic!")widget.clicked.connect(say_hello)return widgetdef say_hello():print("Don't Panic, Hello 42!")
See Also
- https://wiki.qt.io/PySideDocumentation
- https://pyside.github.io/docs/pyside/index.html
- https://pyside.github.io/docs/pyside/modules.html
- https://pyside.github.io/docs/pyside/PySide/QtGui/index.html
- https://pyside.github.io/docs/pyside/PySide/QtGui/QPushButton.html?highlight=qpushbutton
- https://pyside.github.io/docs/pyside/PySide/QtGui/QHBoxLayout.html
Test the new PythonPanel
- Re-Open Houdini.
- Select
Windows->New Floating Panel. (Alt-Shift-W) - Right Click on the Floating Panel’s Pane tab and select
Hello World. - Click the
QPushButtonPanic!.
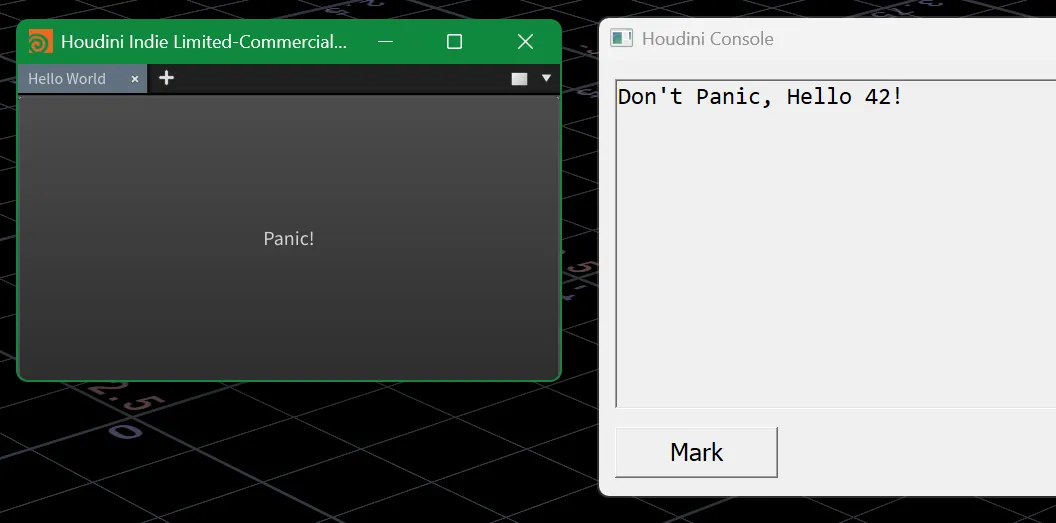
The Houdini Console should popup and print “Don’t Panic, Hello 42!”.
Success Congratulations, you just created your first Python Panel in Houdini.
See Also
- https://www.sidefx.com/docs/houdini/ref/windows/pythonpaneleditor.html - Python Panel Editor
- https://learncreategame.com/techart/houdini-environment-setup/ - Houdini Packages
Author: Michael Schmalle - teotigraphix
Date Published: 03-17-2025